Table of Contents
Match Moving (Camera Tracking) Tutorial for Blender Using Voodoo
As a quick intro for you, this is the sort of thing we'll be showing you how to make: A virtual element within real camera footage. We're going to show you how to get the virtual element to move so that it matches up with the original camera movement.
Introductory Disclaimer
As with all our tutorials, we do not pretend to know what we are doing. These instructions are based on our own experiences and a lot of trial and error. We are not, by any stretch of the imagination, experts. We may get things wrong… often. If you find anything incorrect in this tutorial (or anything else on our website) then please let us know.
Also, this tutorial is for Windows since that was the system we were using when we figured all this stuff out. We will also assume that you have version 2.46 of Blender. You can download it from blender.org. Thanks to amdbcg and rubicon for their suggestions.
Thanks,
John and Scott.
About Match Moving
One of the main reasons that we got into the idea of making a film was the fun stuff that we could do with Blender. Blender is a very capable 3D modelling and animation suite. However, while we really liked the idea of making an animated film and felt that Blender was fully equipped to let us, we did not really think we were up to it (due to a lack of talent and experience). We decided instead that it would be easier to include Blender graphics in a live action film. This process gets used a lot these days and there are three main ways of mixing real and virtual elements in a scene.
The first way (and arguably the simplest) is to use a matte painting. This is when you cover part of the frame with a picture or other video source. Matte paintings are used when the camera will not move but is in a fixed position. This tends to limit what one can do with a shot because the level of interaction between the real and virtual elements cannot be too complex.
The second way is to use some sort of 'green screen' technique (sometimes called Chroma Key). This is when you replace what is behind the real elements of a shot. This involves filming the real elements in front of a screen. The screen will be a unified colour that does not appear in the real elements (high luminance green or blue are popular choices). This colour can then be replaced with whatever background the film makers would like to appear there. The camera shots are still somewhat limited to how complicated you want your green screen set up to be. For example, if you want to track all the way around a real element, you must have a full 360 degrees of green screen. Also, if you want the camera to be moving at all, you will need to track its movements so that the background can be matched to it. Usually this involves drawing dots at known distances on the green screen.
The last type may have a name, but since we don't know what it is, we're going to generalise and call it CGI Compositing Effects. This is when you film something without any tricks and then paste animations on top of the film. This is used frequently in films but a particularly good example might be, “Who Framed Roger Rabbit?” While the drawn animations did not literally interact with the live action stuff, events within the live action shooting can be set up so that animations can be drawn on top of the film to make it look like they caused the events. For example, a door can be filmed to make it look like it opened by itself. A cartoon man can then be drawn in to make it look like it was him that opened the door. Similarly to Green Screen, if you plan on moving the camera during such a shot, then you will need some way to track it.
This last technique is the one we plan to use in our film and is the one we will attempt to demonstrate in this tutorial. We're going to use a fairly simple example to demonstrate the technique as most of the things we are planning do not involve especially complex interactions.
Technique
The largest problem we face is tracking the camera's movements. If the camera is stationary, then it is fairly trivial to put CGI elements into a shot (in terms of technology at least). While there may be one or two shots in our film that use this technique, most will involve a moving camera. However, the best shots can be achieved by limiting the camera's movements to simple panning. That is, the camera is on a tripod and does not change location, just where is it pointing. However, if you wish to use a completely stationary camera then you may still find other aspects of this tutorial useful.
We made a simple panning shot of a desk in John's bedroom, leaving a nice space on the desk where we were planning on adding a virtual object. If you want to follow along with the tutorial using this same footage, you can download it from us.
The first thing we did when we got the footage from the camera was to convert it to a series of Targa (.tga) image files (one for each frame). This is so that it can be used as background images in Blender and so that it can be processed for the camera motion tracking.
Some common mistakes at this stage can be that you do not know the image size of the shots that were taken, their aspect ratio, their frame rate and the focal length of the lens. Make sure that you know these details when you create your source material as it will improve the results.
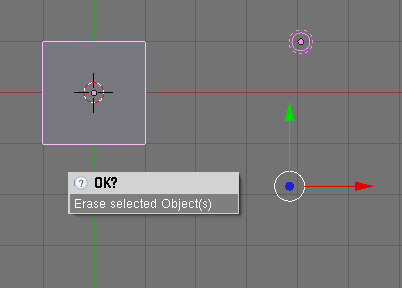
Blender can be used to create the series of Targa files quite easily. Simply open Blender and delete everything in the “3D View” window by selecting everything (hit “A” key until everything is highlighted in pink) and hitting the “X” key.
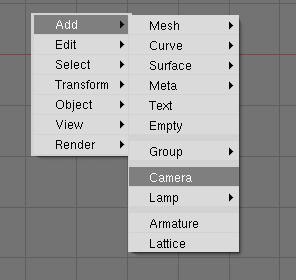
Once everything is deleted, you will need to add a camera back so that we can render out the Targa files. Just hit the space bar while your mouse is over the the 3D View window and select, “Add → Camera.”
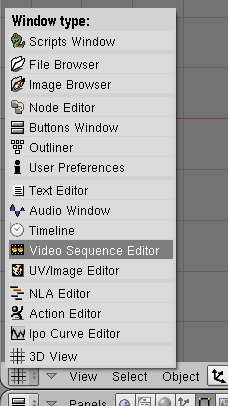
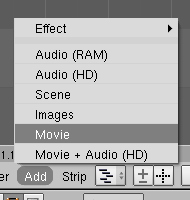
Go into the “Video Sequence Editor” window. Then select “Add → Movie.”
Choose the source video file. Once you click “Select Movie,” you will be in a grab mode with the movie sequence. Move it so that it is on track 1 at frame 1. The number of frames of the movie will be the first thing on it's label. To make sure we render the whole sequence to Targa files, we must set the animation length to match.
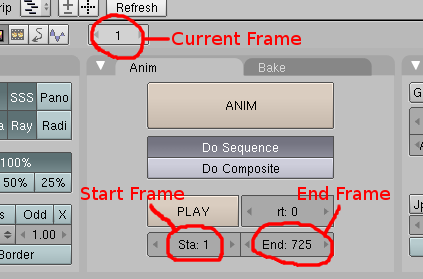
Press “F10” to get to the scene panel. Make sure that the start frame is set to “1” and that the end frame is set to the number of frames in your movie. In our case, this was 725. Make sure you select the “Do Sequence” option and change the output to what is needed.
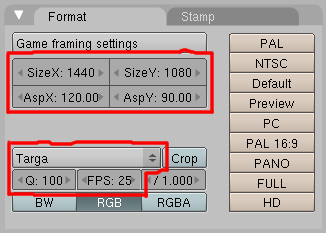
In our case, we want to set up Blender to match the same dimensions as the original source footage. Still in the Scene Buttons Panel, change the SizeX and SizeY of the Format tab to match the original video file. Our source file was 1440 pixels wide and 1080 pixels high. However, the format of the original MPEG video had a 16:9 dimension ratio. A little bit of maths shows us that 1440:1080 is not a 16:9 ratio:
1440 / 16 = 90
1080 /  9 = 120
The two results would be the same if the ratios matched. However, we can simply adjust the aspect ratios of the Blender output to correct this so that we end up with a 16:9 ratio output. We just need to set the AspX and AspY values to match the results of the above equations. For AspX, we use the result of the second equation because the width needs to be compensated by the ratio of the height. Thus, we set AspX to 120. Similarly, we set AspY to the result of the first equation as the height needs to be compensated for by the ratio for the width. Thus, we set AspY to 90. Incidentally, this will not affect the aspect ratio of image files, but since we plan on outputting a video file later, we may as well set it up now. Also remember to set the output format to Targa and set the quality to 100.
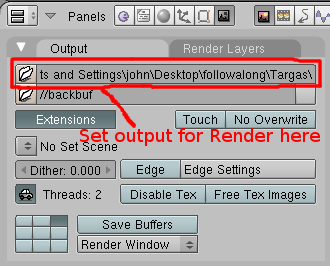
You can select the output for the Targa files by changing the “/tmp\” field in the output tab of the scene panel to the desired directory. Then just hit the “ANIM” button to produce the Targa files. They will be saved in the directory you specified.
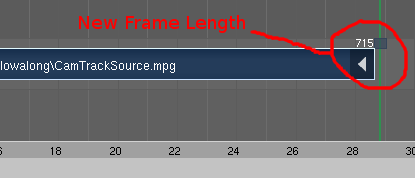
We have noticed that Blender will occasionally output blank frames at the end of a clip instead of the ones from the source video. This appears to me due to some sort of memory issue. We've found the best way to deal with it is to change the start frame to the number of the first blank Targa file and then re-render the blank frames. If it continues to output blank frames, try restarting your computer before the re-render. If that fails, you will have to remove the offending frames. The simplest solution to this is to cut off the frames that are causing the problems. To do this, go back into the “Sequence” view and right click on the right arrow of the video strip and drag it left to a point where you expect the video to be fine. Once no black frames show up and you are happy with the video, you can see how many frames the video strip has become (it's shown on the far right on the video strip) and change the length of the output video accordingly. In our case, we reduced our video length to 715 frames.
Make sure that you save the Blender file somewhere as we will be using it again later.
The next step is to take the Targa files and put them into a Camera Motion Tracking software package. Although there is a discontinued program called “Icarus” that is somewhat popular in the Blender community, we decided to use one called “Voodoo” because it seems easier to use. Both programs are free to use, but Icarus can only be used for educational purposes, while Voodoo can be used for all non-commercial purposes. Sadly, neither program is open source, but we live in hope.
When we originally wrote this tutorial, Voodoo was available to be used for commercial purposes as well. However, one of our readers has now informed us that this policy has changed. We find this rather sad news as we no longer know of a good, free camera motion tracking package that can be used for commercial purposes. There is always a lot of talk in the community about including Camera Motion Tracking as a feature of Blender, but as far as we know no one has ever attempted this. In any case, we thank Robert Hamilton for informing us of the change in Voodoo's terms and conditions.
You can get Voodoo from, http://www.digilab.uni-hannover.de/download.html
Load up Voodoo and choose “File → Load… → Sequence…”. Click “Browse” and select the first Targa file. Our files weren't interlaced and we took the shot from a tripod, so we picked those options. 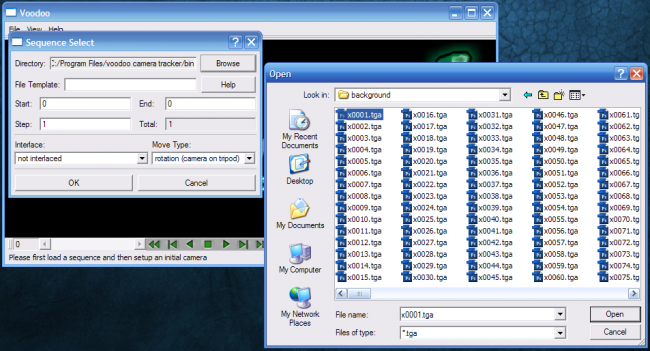 It is also prudent to enter in some information about the camera that you shot the footage with.
So, choose “File → Load… → Initial Camera…”. All you really need to worry about is changing the “Type:”. You can of course do more than that to improve the results, but this was good enough for us. We selected “HDV 1080i 16:9” as this was the closest match to our video footage. We also knew our focal length so we entered that as well (in our case it was “4”).
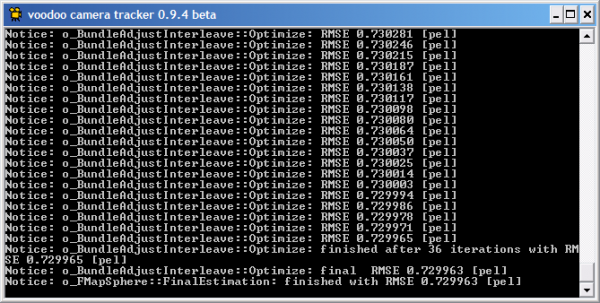
All you need to do now is click on the “Track” button on the bottom right of the Voodoo window. You should see a bunch of little crosses appear on the frame as Voodoo tries to find points in the image to track. ![]() The way Voodoo works is to try and find points in the image that are significant and then track them from frame to frame. By doing this for multiple points, Voodoo can reverse engineer the shot to figure out what movements the camera made. You might find that Voodoo asks you if you would like to refine the results. We'd suggest that you do. You might think that Voodoo doesn't seem to be doing anything after this, but if you look at the command prompt window part of Voodoo you still see a little activity. It can take a very long time to do this residual error correction so be prepared to wait for a while.
The way Voodoo works is to try and find points in the image that are significant and then track them from frame to frame. By doing this for multiple points, Voodoo can reverse engineer the shot to figure out what movements the camera made. You might find that Voodoo asks you if you would like to refine the results. We'd suggest that you do. You might think that Voodoo doesn't seem to be doing anything after this, but if you look at the command prompt window part of Voodoo you still see a little activity. It can take a very long time to do this residual error correction so be prepared to wait for a while.
Once it eventually completes (The command prompt window will include the magic word, “FinalEstimation”) then we can export the information about the camera so that it can be used in Blender.
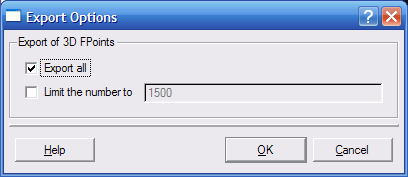
Click “File → Save… → Blender Python Script…” and save the information in a file somewhere (we called ours “cammotion.py”). This will be a Python file that we can use in Blender. Make sure you select “Export all” in the next window. Our own file is available to download.
You should now be able to quit Voodoo tracker and load up Blender.
We're going to assume you know Blender a bit because this is quite an advanced tutorial anyway. Load up Blender and open the file we created earlier. Go to the 3D View and make sure you delete everything in the scene by selecting everything (hit “A” key until everything is highlighted in pink) and hitting the “X” key.
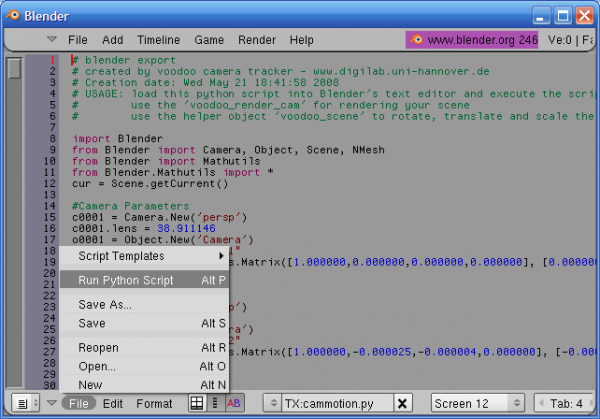
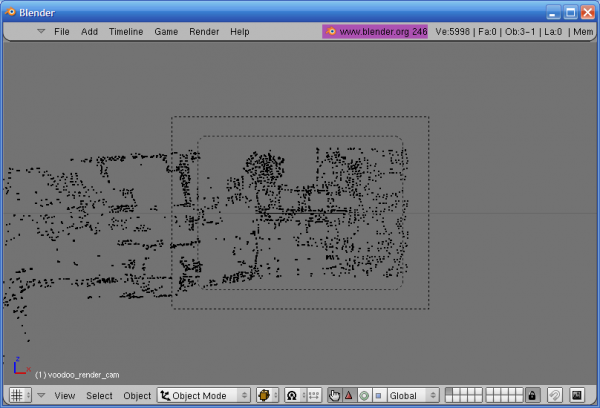
Once the scene is empty, change to Blender's Text Editor window and open the “cammotion.py” file (or whatever you called it). Then run it and you're 3D View should now have a camera and a bunch of dots on it. Hit “NUMPAD 0” to see the camera's viewpoint.
Press “F10” to get to the scene panel and change the start in the animation tab to 1. Find out how many Targa files your animation produced to get the frame number for the end. In our case, we had 715 Targa files so we had 715 as our end frame. Change the Buttons Window's current frame to 1.
You can now see the tracking of the camera in Blender. In the 3D View Window, hit “ALT+A” to see the animation from the camera's viewpoint (Hit “ESC” to stop it). You should see that the little dots match the green crosses that were seen in the Voodoo Tracker. The virtual camera movement should match the original camera quite well. The dot's are not in their correct 3D position, however, but will look that way when viewed through the camera. If you change to a different view you will see that the dots are probably in a surprising position. If it bothers you that the camera is at a funny angle, there is an empty in the same position as the camera. Right click near the camera until you see a dot selected instead of the camera. This empty is grouped to everything else created by the python script, so you can rotate it to suit you. You can also use this empty to match the scene with shots that have a worth match move. It is a quick way to change everything in the scene to match the virtual elements with the original footage.
To make things easier still for us we need to set up Blender a little further. We want to set up the virtual camera to show a background image that will help us sync things up. The dimensions of the virtual camera should still be set up correctly from before.
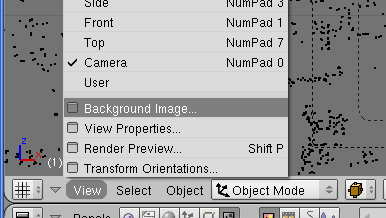
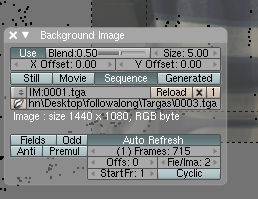
While viewing from the camera, bring up the Background Image window (“View → Background Image…”). Click “Use Background Image” then click “Load”. Find and select the first of the Targa files (“0001.tga” in our case). Now click “Sequence” and then “Auto Refresh”. Still in the Background Image window, change “StartFr” to 1 and change “Frames” to the number of Targa files (715 in our case). Again, you can check how it worked by hitting “ALT+A” from within the 3D View window (Hit “ESC” to stop it).
If you find that the dots do not perfectly match the background image, you may be using incorrect values for the AspX and AspY. This can sometimes occur if you chose the wrong initial camera type in Voodoo. To correct this, you'll need to fiddle about with these two values until things line up better.
At this point you should be able to add your virtual elements and match them up with the original scene by checking the view in the camera. Remember that the dots in the scene are not in their correct 3D position, but will show the rough focal distance of the original camera. So, elements that should be in focus in your shot should probably be placed at the same distance from the virtual camera as the dots. You may have to play about with the camera a bit to match the lens better. You can do this by selecting the camera and hitting “F9”. It's important that you set your objects at a good distance from the camera if you want to get a good perspective on them. This is largely a trial and error process.
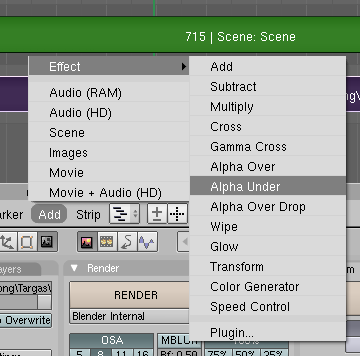
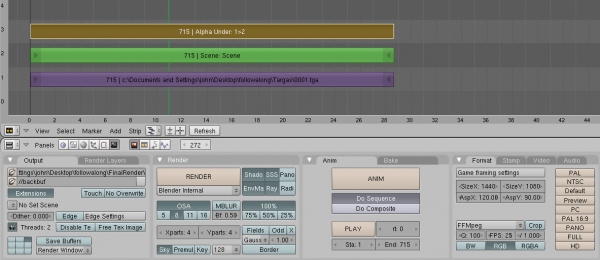
Once you have your scene all set up, you'll need to tell Blender to use the original footage for the background during the render (you may not always want to do this but this is a nice quick way for this test). If you go back to the Video Sequence Editor you should see that the original video is still there from earlier on. Select the video and delete it. We're going to use the Targa files we created instead as this will ensure a perfect frame rate match with the Blender scene. Add the Targa files by selecting “Add → Images.” now navigate to the directory with your Targa files and hit “CTRL+A” to select them all. You can right-click to deselect any files that are not part of the image sequence. Move the video strip to track 1 at frame 1. You can then add in the scene by selecting, “Add → Scene → Name of Scene.” In our case the “Name of Scene” was “scene.” Add the scene strip on track 2 at frame 1. First select the scene strip and then hold shift and select the original film strip as well. Now select, “Add → Effect → Alpha Under.” A new strip will be created. Place it on track 3 at frame 1.
You can now select the output format you want to use for the video in the Format tab of the Scene Panel (F10). We choose FFMpeg with an MPEG 2 output at 100 quality. We kept our frame rate at 25 fps to match our original footage. Then just hit the “ANIM” button to produce your render (“Do Sequence” should still be selected from earlier, as well as the resolution and aspect ratio). It will be saved in the directory you specified earlier.
Thoughts
While this tutorial has focussed on match moving alone, there are many other things that you can do to improve your images. For example, you might include shadows and lighting that match the real elements of the shot. If there are reflective surfaces in the original shot, you might want to get your virtual elements to appear. The main thing to consider is how the object would affect the real elements if it was also real. We may try to give a tutorial on these issues at a later date. As an example, here is the same shot shown at the start of the tutorial with the addition of shadow and reflection:
Problems
The first issue (which you may have realised for your selves) with our shot is that there were no moving elements. Match moving largely relies on the idea that there are a lot of elements in the shot that are stationary and that it is mainly the camera that is moving. However, you can still include moving things in the shot (like actors and such), but you will probably get results that are not quite as good. Also, if you choose not to use a tripod shot and use a free moving camera, you may find the results will be way off. Some of the tests we did with this weren't very good. Our recommendation for good results is to limit the number of active elements in the original shot and try to stick to tripod-based panning.
You may also find that the perspective in Blender does not line up with the original shot. This usually stems from keeping the object at an incorrect distance from the camera. Generally, moving the object to different distances from the camera and resizing it to compensate can solve this problem. However, you might find that adjusting the focal length settings in Voodoo can also improve these perspective issues. The ideal situation is for the original camera, the voodoo settings and the Blender virtual camera to all have exactly the same settings. If you can achieve this then you will get the best results.
This tutorial has not covered shadows, reflections, lighting and when real elements move in front of the virtual elements. We hope to cover all of these in a later tutorial.
We hope you've enjoyed this tutorial and we fully welcome feedback and improvements. We have no idea how half this stuff works, but this is how we did it. If anyone knows of a better way, please let us know.
We love you all,
John and Scott.
Spread The News
 digg it ::
  del.icio.us ::
  technorati ::
  reddit ::
  StumbleUpon
 newsvine ::
  ma.gnolia ::
  furl ::
  blinklist ::
  blogmarks
